Overclocking The AMD Ryzen APUs: Guide and Results
by Ian Cutress & Gavin Bonshor on April 16, 2018 2:30 PM ESTHow to Overclock With MSI UEFI BIOS
The MSI UEFI BIOS is aesthetically pleasing and is easy to navigate around. The core features between the board being used for testing today, the MSI B350I Pro AC, and other models in their AM4 line up such as the X370 XPOWER GAMING TITANIUM are the same, with the same options for adjusting CPU core voltage, DRAM voltage and for the iGPU. It needs to be noted that the GFX Core voltage and CPU NB/SoC voltages are linked together; only one of them needs to be adjusted.
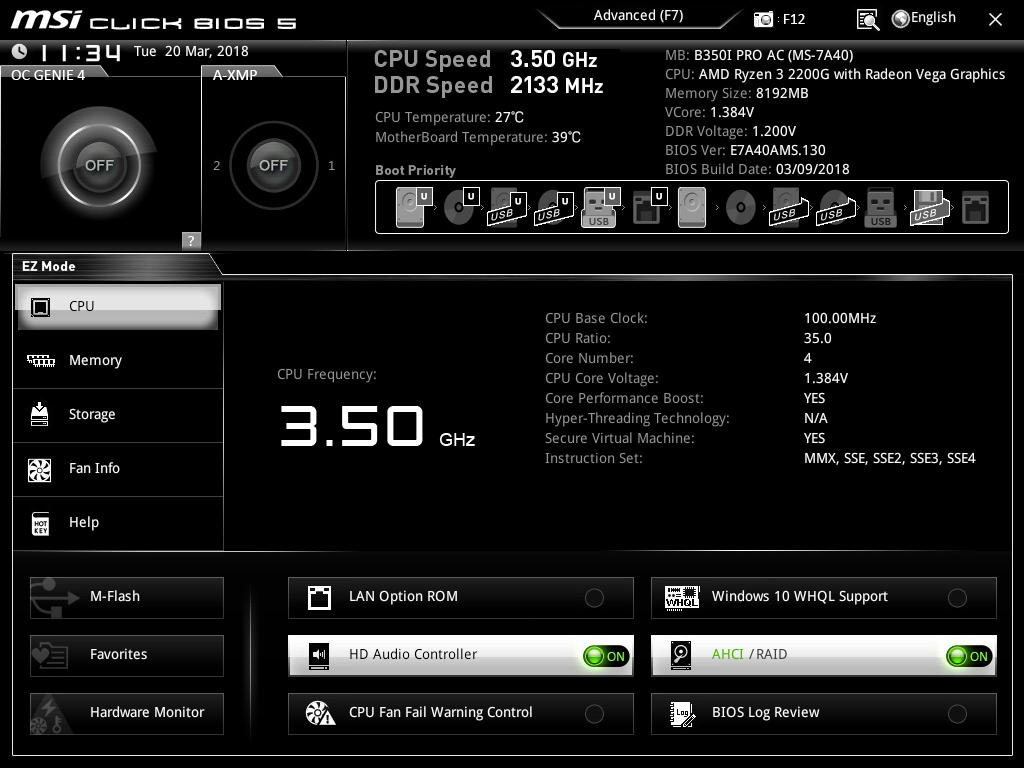
Hitting the Del key during system POST will get you into the first screen. The first screen is what MSI call ‘EZ mode’ which offers the basic panels for making minor adjustments.
Pressing F7 opens up the advanced section.
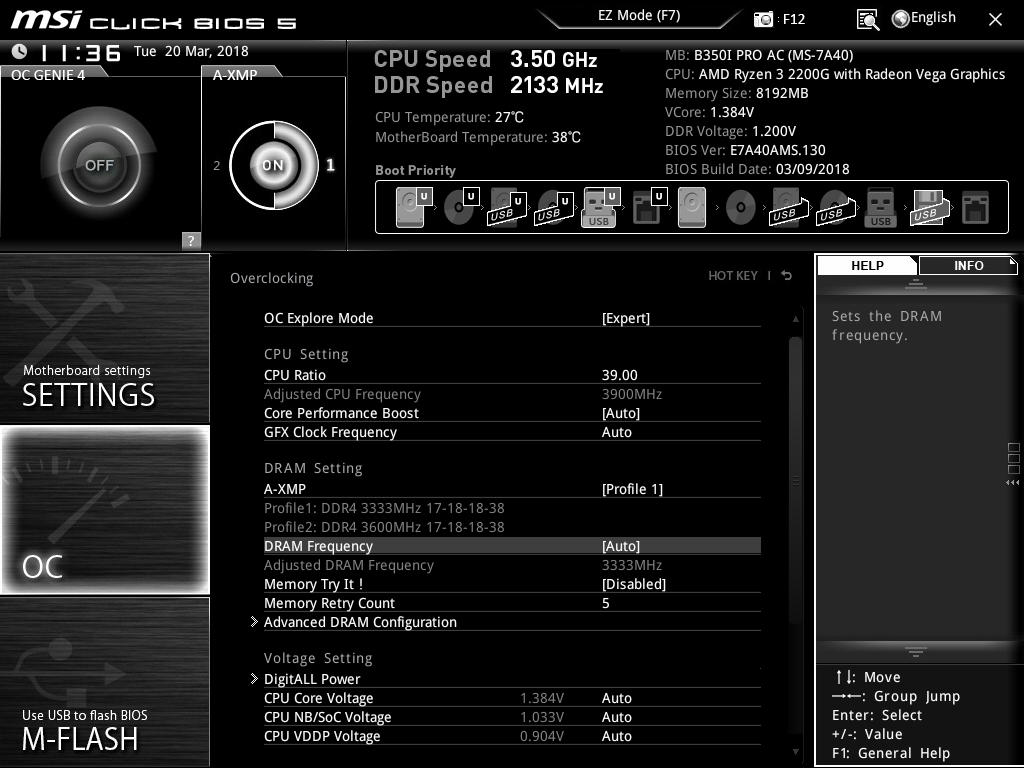
This offers high-level tabs for settings, OC and M-Flash. The overclocking panel is on the left, giving rise to the voltage parameters, CPU frequency multipliers, memory frequency, and the iGPU options.
On this particular board, all the options that need to be changed are all featured on the entry screen when the OC tab is selected. The CPU ratio can be adjusted by pressing +/- keys or by typing in a value. Voltage is in the Voltage Setting category a few options down, and is by default set to auto. For memory, XMP (shown as A-XMP) was set to profile 1 to enable DDR4-3333 mode.
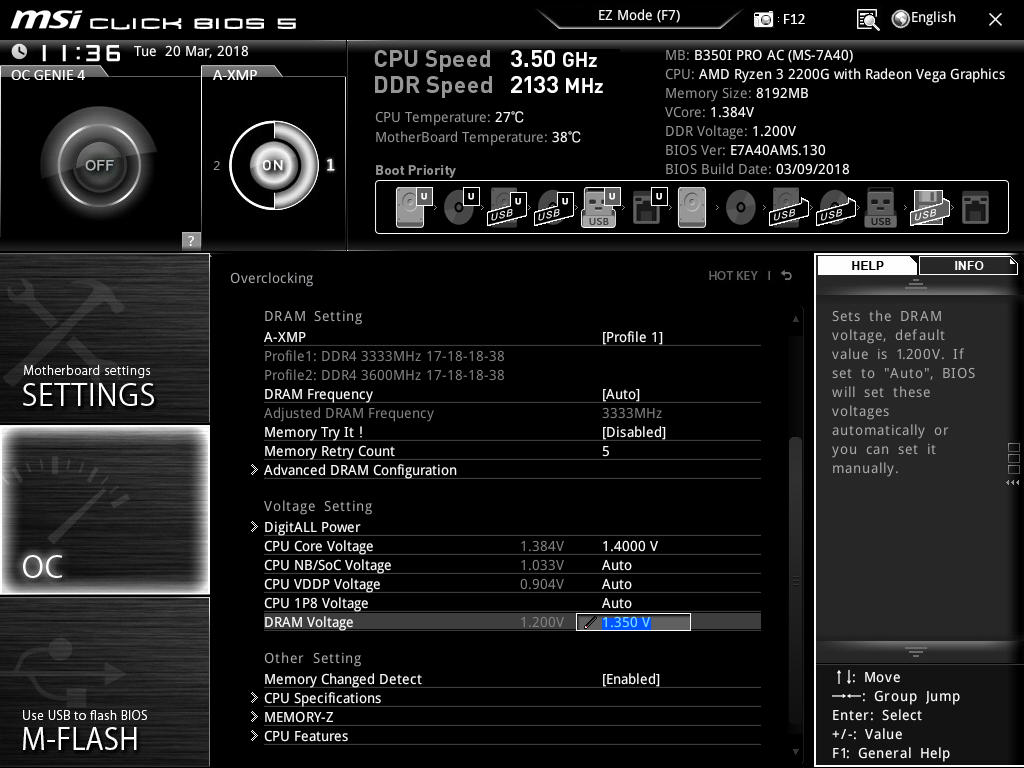
The CPU core voltage options in the BIOS can only apply a maximum of 1.4 volts. Users looking to apply more can use the AMD Ryzen Master Utility which will allow for up to 1.55 V, although this is too much for ambient cooling and we would not recommend it. For our testing, this was set to 1.375 volts to match with our test setup and methodology settings. The memory voltage was manualy set to 1.35 volts to ensure it matched the specifications of our G.Skill Ripjaws DDR4’s first XMP profile.
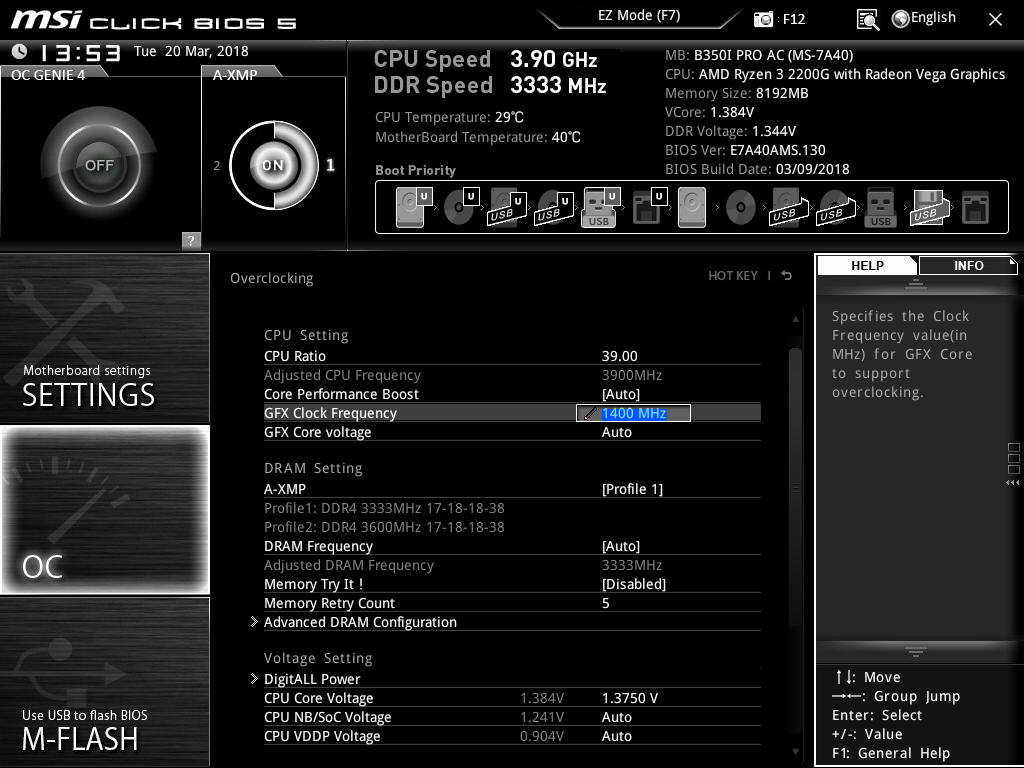
Overclocking the graphics on our AMD Ryzen 3 2200G APU was also as easy as the rest, with the only settings needing changing is the GFX clock frequency, which we set to 1375 MHz.
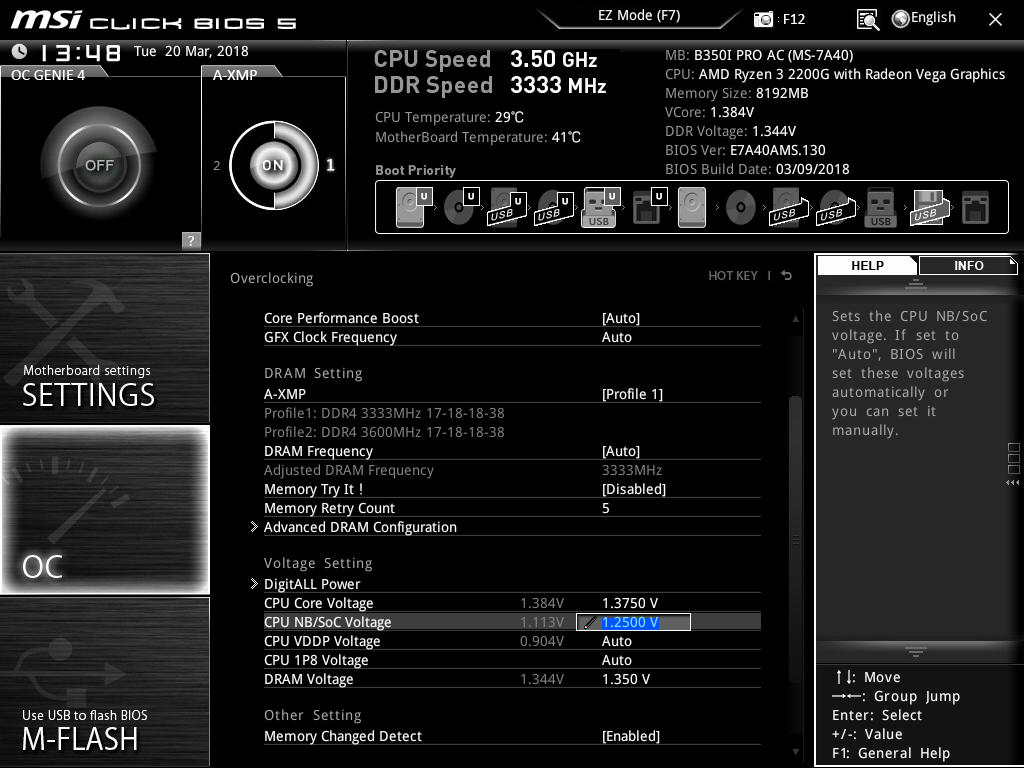
When it comes to setting the voltages for the integrated graphics processor, the SoC voltage and the graphics voltage are linked, so changing one changes the other.
Once the settings are chosen, pressing F10 will bring up a summary of the changes made since the system was booted. Selecting yes will cause the system to reboot with the new settings.
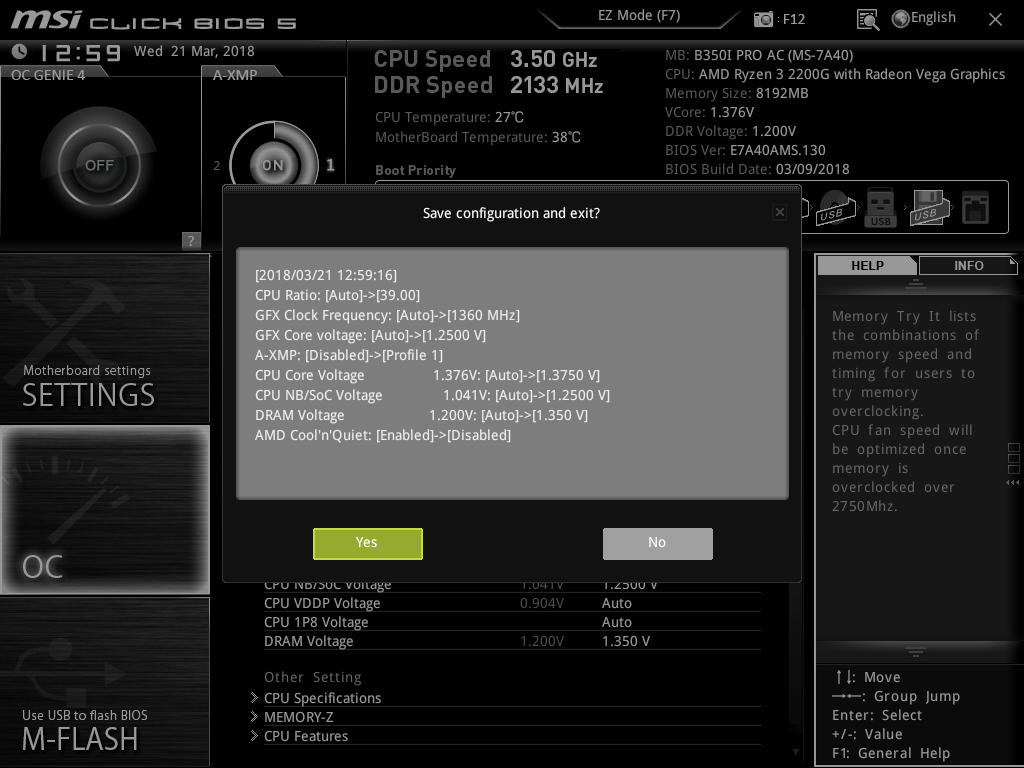
Note: AMD’s Cool’n’Quiet function is automatically disabled on MSI motherboards when the CPU ratio is changed. Also, when OC explore mode is set from normal to expert, it opens up a setting called memory retry count. This is handy when manually overclocking memory as it will attempt to POST with a set variable amount, which automatically defaults at 5.


63 Comments
View All Comments
jjj - Monday, April 16, 2018 - link
Yet to fully read the article but P-state OC and baseclock OC are nice if you can avoid entering OC mode that way, at least with Ryzen. No idea what works and what doesn't with RR, haven't kept up on it but do care about that with Pinnacle Ridge.RarG123 - Monday, April 16, 2018 - link
Look at this: https://www.gamersnexus.net/guides/3251-raven-ridg...So SoC (seemingly 2D clocks) voltage should be left at ~1.1V, and GFX (seemingly 3D clocks) voltage should be at ~1.2V max in order to remain within safe limits in all scenarios. This might have changed with the latest BIOSs but until such time that it's tested, it's better to err on the side of caution.
Also for anyone with HWMonitor, if some data points aren't getting displayed correctly, give HWInfo a shot it's more Ryzen friendly.
Lolimaster - Tuesday, April 17, 2018 - link
For true OC check techepiphany on youtube.eastcoast_pete - Monday, April 16, 2018 - link
Good and informative article. I had planned to build an HTPC setup around the 2400G, alas both the 2200 and 2400 seem to be falling short on the home theater side (4K HDR playback at 60p using MPC-HC with madVR). If this has changed, please correct me, with the link to the source showing that they are now able to do so - Thanks!Somewhat related: I would be interested to see how far one can undervolt the 2400G CPU and GPU and still get stable sort-of stock performance. [yes, I know - there's always at least one who has to be contrarian - still chasing the quiet setup]
JoeyJoJo123 - Monday, April 16, 2018 - link
I'd recommend just using MPV. The visual gains that the MadVR scaler uses can be extremely taxing on the GPU, depending on the settings used. With good MPV settings it literally looks 95% as good as MPC-HC + MadVR looks, at a fraction of the computational intensity, ie: less fan noise while playing back media, which you'll hear when playing back content.Lolimaster - Tuesday, April 17, 2018 - link
You always need to config the fans rpm, I lock my CM Hyper 212+ to 600-800rpm, dead silent.Lolimaster - Tuesday, April 17, 2018 - link
Undervolt helps achieving that without worrying about load temps.Lolimaster - Tuesday, April 17, 2018 - link
There's a reddit post (just google it)2400G system stock 105w
undervolted 75w
:D
eastcoast_pete - Tuesday, April 17, 2018 - link
Thanks! According the pictures posted on reddit, undervolting a 2400G resulted in almost stock performance (less than 5% difference vs. stock, and only one benchmark, but still, promising) and an almost 25% reduction in Wh drawn for the entire setup; he used a kill-a-watt Wattmeter.Just like some people here and on reddit, I wonder if the new MoBo chipsets could allow fine-tuning, so for GPU-limited games, undervolt the CPU, and use the ~ 10-25 Wh thermal headroom gained to overclock /overvolt the GPU. Doing so might even work just with the stock cooler. Has anybody tried? Ian, can you try it?
eastcoast_pete - Tuesday, April 17, 2018 - link
Sorry, meant to address both of you: Ian, Gavin, can you try it?